- 浏览: 985003 次
- 性别:

- 来自: 杭州
-

文章分类
- 全部博客 (826)
- τí¼Σ╗╢ (8)
- 软件 (24)
- 软件工程 (34)
- JAVA (229)
- C/C++/C# (77)
- JavaScript (8)
- PHP (1)
- Ruby (3)
- MySQL (14)
- 数据库 (19)
- 心情记事 (12)
- 团队管理 (19)
- Hadoop (1)
- spring (22)
- mybatis(ibatis) (7)
- tomcat (16)
- velocity (0)
- 系统架构 (6)
- JMX (8)
- proxool (1)
- 开发工具 (16)
- python (10)
- JVM (27)
- servlet (5)
- JMS (26)
- ant (2)
- 设计模式 (5)
- 智力题 (2)
- 面试题收集 (1)
- 孙子兵法 (16)
- 测试 (1)
- 数据结构 (7)
- 算法 (22)
- Android (11)
- 汽车驾驶 (1)
- lucene (1)
- memcache (12)
- 技术架构 (7)
- OTP-Erlang (7)
- memcached (17)
- redis (20)
- 浏览器插件 (3)
- sqlite (3)
- Heritrix (9)
- Javaτ║┐τ¿ï (1)
- scala (0)
- Mina (6)
- 汇编 (2)
- Netty (15)
- libevent (0)
- CentOS (12)
- mongod (5)
- mac os (0)
社区版块
- 我的资讯 ( 0)
- 我的论坛 ( 4)
- 我的问答 ( 0)
存档分类
- 2013-07 ( 1)
- 2013-06 ( 1)
- 2013-05 ( 11)
- 更多存档...
最新评论
-
kingasdfg:
你这里面存在一个错误添加多个任务 应该是这样的 /**   * ...
Quartz的任务的临时启动和暂停和恢复【转】 -
kyzeng:
纠正一个错误,long型对应的符号是J,不是L。
Jni中C++和Java的参数传递 -
zhaohaolin:
抱歉,兄弟,只是留下作记录,方便学习,如果觉得资料不好,可以到 ...
netty的个人使用心得【转】 -
cccoooccooco:
谢谢!自己一直以为虚机得使用网线才可以与主机连接呢。。
主机网卡无网线连接与虚拟机通信 -
yuqilin001:
要转别人的东西,请转清楚点嘛,少了这么多类,误人子弟
netty的个人使用心得【转】
持续集成之路——搭建Maven私服
- 博客分类:
- 软件工程
在开发过程中,有时候会使用到公司内部的一些开发包,显然把这些包放在外部是不合适的。另外,由于项目一直在开发中,这些内部的依赖可能也在不断的更新。可以通过搭建公司内部的Maven服务器,将第三方和内部的依赖统一管理。
      这里使用Nexus来搭建本地的Maven服务器,过程比较简单。
      一、安装服务器
      1、下载
      我们可以在nexus的官网 上找到它的相关介绍,下载地址是:http://nexus.sonatype.org/downloads/ ,在这里可以找到最新的版本,如果需要以前的版本,在官网上应该也可以找到下载地址。我下载的是:nexus-oss-webapp-1.8.0-bundle.tar.gz 。关于Nexus的详细使用方法可以参照:Repository Management with Nexus .
      2、安装
      解压下载的文件:
      # tar xzvf nexus-oss-webapp-1.8.0-bundle.tar.gz
      解压后会在同级目录中,出现两个文件夹:nexus-oss-webapp-1.8.0和sonatype-work,前者包含了nexus的运行环境和应用程序,后者包含了你自己的配置和数据。
      3、启动nexus
      在上面的提到,nexus的运行环境在nexus-oss-webapp-1.8.0目录,下面就进入这个目录启动:
      # cd nexus-oss-webapp-1.8.0/bin/jsw/linux-x86-64/
      在这个目录下包含了一个文件夹和三个文件:lib、nexus、platform和wrapper,其中nexus就是启动命令。
      # ./nexus
      执行上面的命令,可以得到nexus命令的用法提示:start 命令启动,stop命令停止。下面启动nexus:
      # ./nexus start
      Starting Nexus OSS...
      Started Nexus OSS
      从控制台输出可以看到Nexus已经启动成功,我们可以通过log文件查看更详细的信息:
      # cd ~/nexus-oss-webapp-1.8.0/log
      # tail -f wrapper.log
      在log中可以看到nexus默认监听的端口是8081。那么我们就可以在浏览器中访问:http://host:8081/nexus,


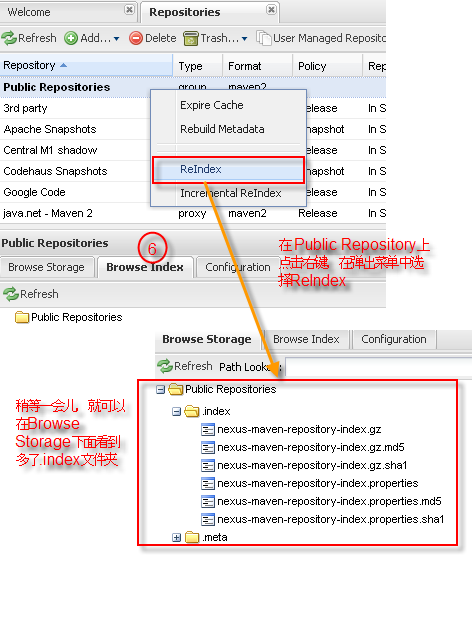
       二、配置Nexus
       由于在新搭建的nexus环境中只是一个空的仓库,所以第一步就是要和远程的Maven中心仓库进行同步。
 
        
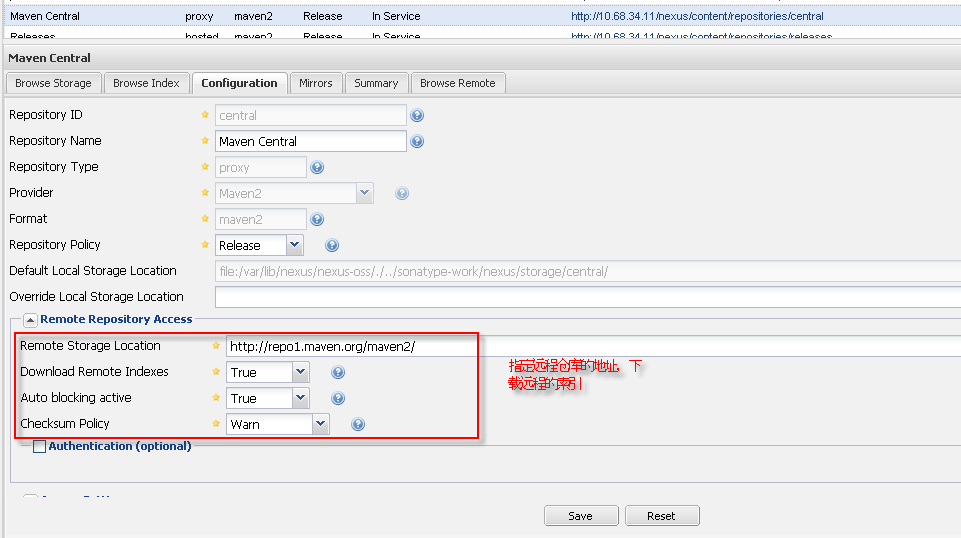
       如果在Reindex之后,并没有同步到远程的仓库,可以检查每个仓库的设置。下面是Maven Central的设置:
       三、在项目中使用私服
 
       在完成了上面的配置后,就可以将项目中默认的Repository切换为本地的私服了,只需要在pom.xml中增加repositories就可以了:
 
- < project   xmlns = "http://maven.apache.org/POM/4.0.0"   xmlns:xsi = "http://www.w3.org/2001/XMLSchema-instance"   
-   xsi:schemaLocation = "http://maven.apache.org/POM/4.0.0 http://maven.apache.org/xsd/maven-4.0.0.xsd" >   
-   < modelVersion > 4.0.0 </ modelVersion >   
-   
-   < groupId > org.maven.demo </ groupId >   
-   < artifactId > MavenDemo </ artifactId >   
-   < version > 0.0.1-SNAPSHOT </ version >   
-   < packaging > jar </ packaging >   
-   
-   < name > MavenDemo </ name >   
-   < url > http://maven.apache.org </ url >   
-   
-     < repositories >   
-         < repository >   
-             < snapshots >   
-                 < enabled > true </ enabled >   
-             </ snapshots >   
-             < id > public </ id >   
-             < name > Public Repositories </ name >   
-             < url > http://172.28.189.138:8081/nexus/content/groups/public/ </ url >   
-         </ repository >   
-     </ repositories >   
-     < pluginRepositories >   
-         < pluginRepository >   
-             < id > public </ id >   
-             < name > Public Repositories </ name >   
-             < url > http://172.28.189.138:8081/nexus/content/groups/public/ </ url >   
-         </ pluginRepository >   
-     </ pluginRepositories >   
-     < dependencies >   
-         < dependency >   
-             < groupId > junit </ groupId >   
-             < artifactId > junit </ artifactId >   
-             < version > 4.8.1 </ version >   
-             < type > jar </ type >   
-             < scope > compile </ scope >   
-         </ dependency >   
-     </ dependencies >   
-     < properties >   
-     < project.build.sourceEncoding > UTF-8 </ project.build.sourceEncoding >   
-   </ properties >   
- </ project >   
       将pom.xml保存后,再回过头来了看去nexus管理界面看,就会发现junit已经被下载到本地的nexus服务器中了。


- 2011-06-15 15:01
- 浏览 1038
- 评论(0)
- 分类:编程语言
- 查看更多
发表评论

-
eclipse使用SVN创建,合并分支[转]
2011-11-11 17:11 865之前一直使用"小乌龟"进行分支建立与 ... -
持续集成之“依赖管理”
2011-08-04 18:10 769来源: infoq   发布时间: 2011-0 ... -
持续集成理论和实践的新进展
2011-08-04 18:10 943作者: 肖鹏  来源: InfoQ   发布时间 ... -
Maven原理和Maven2新特性
2011-06-30 16:02 1017Maven的基本原理和Maven2的新特性 用Maven做项 ... -
结合Maven2进行J2EE项目构建
2011-06-29 21:13 1159Σ╕Ç.ΦâîµÖ» Maven2 τÜäσƒ║µ£¼σ ... -
用Maven做项目管理
2011-06-29 21:10 992用 Maven 做项目管理 在 Java世界中我们 ... -
天生一对"Maven2+Jetty" -- Maven2创建并管理WebApp
2011-06-29 19:21 1269Maven2代比1代改进很多,其中主要强调的是--它不仅仅是个 ... -
Maven实战(四)——基于Maven的持续集成实践
2011-06-28 13:16 925MartinτÜäπÇèµîüτ╗¡Θ¢åµêÉπÇï τ¢ ... -
Hudson+Maven+SVN 快速搭建持续集成环境
2011-06-28 13:07 984hudson 是一个可扩展的持续集成引擎,Hudson非常 ... -
敏捷开发、极限编程
2011-06-27 00:35 839什么是敏捷开发?一种以人为核心、迭代、循序渐进的开发方法。在敏 ... -
敏捷开发简介
2011-06-27 00:34 1137在软件工业界,敏捷开发已成为众多高效开发团队的制胜之道。它不仅 ... -
用SecureCRT连接VMware中的Linux系统
2011-06-16 22:03 1564一、预备知识: Secure: SecureCRT将S ... -
持续集成之路——Maven
2011-06-15 15:04 695写在前面       ... -
持续集成之路——Maven(续)
2011-06-15 15:02 823接上篇)在新创建了项目之后,可以看到目录结构:   ... -
Maven仓库管理-Nexus(转帖后加强版)
2011-06-15 15:00 1982前面我讲到为什么要使用Maven, Maven的安装,以及如何 ... -
maven下nexus的搭建,jar包上傳等注意事項
2011-06-15 14:58 2438nexusµÿ»τö¿Σ╛åµÉ¡σ╗║µ£¼σ£░jarσî ... -
解决nexus下载maven索引的问题
2011-06-14 23:23 3109σ£¿Σ╕èΣ╕¬σæ¿Σ║öσ£¿σà¼σÅ╕τÜäΣ╕Çσ ... -
Maven仓库管理-Nexus(转帖后加强版)
2011-06-14 00:50 1058前面我讲到为什么要使用Maven, Maven的安装,以及如何 ... -
Hudson+Maven+SVN 快速搭建持续集成环境
2011-06-08 01:04 822hudson 是一个可扩展的持 ... -
海量小文件存储
2011-06-04 16:41 2329Web2.0网站,数据内容以几何级数增长,尤其是那些小文件 ...
相关推荐
Maven3培训教程.pdf Maven实战.pdf MavenQuickReferenceCard.pdf MavenTheDefinitiveGuide.pdf Maven学习.doc 持续集成之路——搭建Maven私服.doc 利用m2eclipse生成WTP项目.pdf
Windows 下Nexus搭建Maven私服 Windows 下Nexus搭建Maven私服
Maven3培训教程.pptx MavenQuickReferenceCard.pdf MavenTheDefinitiveGuide.pdf Maven实战.pdf Maven实战——入门篇.pdf Maven学习.doc 持续集成之路——搭建Maven私服.doc 利用m2eclipse生成WTP项目.pdf
Nexus搭建Maven私服 +maven安装步骤
关于使用Nexus搭建Maven私服的开发文档。新手了解一下。
经过近一个月的研究,完成了对maven、git、jenkins、tomcat的集成,超详细的搭建步骤,适合新人研究参考
linux下搭建内网maven私服
Maven Nexus 私服搭建 从零开始,资源下载、安装指导、开发配置说明
在CentOS7上用Nexus3搭建Maven私服。 一、需要的环境 CentOS 7里需要安装jdk8和Maven3,具体的安装步骤可以百度一下。 二、需要的包 需要nexus3的安装包,官网上https://www.sonatype.com/download-oss-sonatype...
搭建maven私服的软件,包括maven版本3.5.3,nexus版本3.12.1
使用Nexus1.8搭建MAVEN私服详细步骤,以及在网页上上传JAR包
提供了基于Nexus搭建Maven私服所需要的一切资源和个人经验,搭建后可maven deploy 上传自己的jar包。别人如何在自己的maven项目中引用我将单独再上传一份。
maven使用及Nexus搭建Maven私服
详细的使用Nexus搭建Maven私服的步骤指导
附件是自己使用docker在内网和外网搭建Maven私服Nexus3所总结的文档,通过该文档可以在内网搭建属于自己的nexus私服,提高自己的生产力。
搭建Maven私服,并配置Nexus环境.rar
使用nexus 可以搭建maven私服,如何使用nexus搭建maven 本地服务器呢?
maven私服搭建文档里简单介绍了maven私服的搭建及配置
操作步骤清晰 简单易懂,分分钟就完成搭建